Friday, 9 October 2015

Crawling with OpenWebSpider

Spiderman, Where are You Coming From Spiderman?

Sometimes you just need the right tools to help you do what you want. This is especially true when the tool you are limited to has a bunch of restrictions. I ran into this particular problem the other day when I wanted to "spider" a website to find out all its possible URLs being served, including the URLs that are ignored by the usual "robots.txt" file sitting on the web server.

I actually had to find a way around the "robots.txt" file for a web site that was blocking web crawlers from finding most of the URLs that were available. Imagine a spider that is crawing through a tunnel, looking for all the tasty bugs - and there is a giant boulder in the way providing the biggest obstacle possible to getting those bugs it wants to feed on.

My requirements for a spider alternative (if possible) were:
  • free
  • no lengthy configuration
  • a GUI
  • a way of ignoring the "robots.txt" file's instructions
  • the search results in a spreadsheet file
  • able to run on Windows (and Linux too, if possible)
After some googling, I experienced true frustration at only being able to find command-line libraries or gigantic, enterprise-level Java applications. Then I came across an open source project named OpenWebSpider. The project's website is a bit confusing but it's worth persevering through.

OpenWebSpider is a neat application written in node.js, which crawls a website and saves its results to a database that you nominate. The project seems to be reasonably active and at the time of writing is hosted on SourceForge. To get the application going in Windows, first you'll need to do a few things.

Install WAMP Server

OK, so the database I wanted to store my results in was MySQL. One of the best ways to get this (and other nice bits) in Windows is to install the handy WAMP server package. (However, the providers do warn you that you might first need a Visual Studio C++ 2012 redistributable package installed.)

One you do get WAMP Server installed, you'll have a nice new "W" icon in your system tray. Click on it, then click Start All Services.


You can view the MySQL database in the phpMyAdmin interface, just to be nice and friendly. In your browser then, go to:
http://localhost/phpmyadmin

Note: if you have any troubles with phpMyAdmin, you might have to edit its config file, usually in this location:
C:\wamp\apps\phpmyadmin4.x\config.inc.php

In phpMyAdmin, create a database to store your spidering results (I've named my database "ows"). Also create a user for the database.

Install node.js

Node.js is one of the most wonderful Javascript frameworks out there, and it's what OpenWebSpider is written with. So go to the node.js project site, download the installer and run it. Check that node.js is working OK by opening a command shell window and typing the word "node".


Get OpenWebSpider and Create the Database's Schema

Download the OWS zip file from Sourceforge. Unzip the file. Inside the project folder, you'll see a number of files. Double-click the "openwebspider.bat" file to launch the application in a little shell window.


Then, as the readme.txt instruction file tells you:
  • Open a web-browser at http://127.0.0.1:9999/
  • Go in the third tab (Database) and configure your settings
  • Verify that openwebspider correctly connects to your server by clicking the "Verify" button
  • "Save" your configuration
  • Click "Create DB"; this will create all tables needed by OpenWebSpider

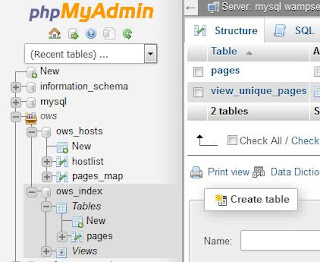
Now, check your database's new tables in phpMyAdmin:


 Start Spidering!

Go to the OWS browser view, ie. at http://127.0.0.1:9999/. Click on the Worker tab and alter any settings you might thing useful. Enter the URL of the site you want to crawl in the URL box (and make sure "http://www" is in front if needed). Then hit the Go! button.
You should then be bounced to the Workers tab. Here you'll get see real-time progress of the site crawling as it happens. You can click on the second-tier History tab if you miss the crawler finishing its run.

View Your Results

In phpMyAdmin, click on the pages table and you should automatically see a view of the crawling results. You might not need all the columns you'll see, in fact my usual SQL query to run is just something like:
select hostname, page, title from pages where hostname = 'www.website.com';


And of course, anyone with half a brain knows you can export data from phpMyAdmin as a CSV file. Then you can view your data by importing the CSV file into a spreadsheet application.


Ignore Those Pesky Robots

Please note, the next instruction is for the version of OpenWebSpider from October 2015. It probably is outdated for the latest version now.

One of the requirements was that we could bypass the "robots.txt" file, which good web crawlers by default must follow. What you'll need to do is close OpenWebSpider, and just edit one source code file. Find this file and open it up in a text editor: openwebspider\src\_worker\_indexerMixin.js.

It's a Javascript file, so all you need to do is comment out these lines (with // symbols):
 // if (!canFetchPage || that.stopSignal === true)
        // {
            // if (!canFetchPage)
            // {
                // msg += "\n\t\t blocked by robots.txt!";
            // }
            // else
            // {
                // msg += "\n\t\t stop signal!";
            // }

            // logger.log("index::url", msg);


            // callback();

            // return;
        // }

Re-save the file. Then launch OWS again, and try another search. You'll usually find the number of found URL results has gone up, since the crawler is now ignoring the instructions in the "robots.txt" file.

Everyday Use

It's a good idea to make a desktop shortcut for the "openwebspider.bat" file. So, if you want to use OpenWebSpider regularly, what you'll need to remember to do each time you need it is:
  • Start up the WAMP server in the system tray
  • On the desktop, double-click the "openwebspider.bat" shortcut icon
  • In a browser, go to localhost:9999 (Openwebspider) to run the worker
  • In a browser, go to localhost/phpmyadmin to see your results

Happy spidering!

Saturday, 28 February 2015

Python & Google Search API Requests

It's been a while since I've been able to blog something. Anyway, out of all the geeky things I could write about which I've been tinkering with (reponsive HTML email layouts, Symfony2 secure users set ups, etc)., I just thought I'd share something for a Google API that should have easy instructions for accessing it through Python somewhere but doesn't. You'll see lots of information out there about putting a CustomSearch box and results in your browser with Javascript block, but we want to do it with Python, right?

Google provide a generic "how to access Google APIs through Python" guide here:
https://developers.google.com/api-client-library/python/

However, it's not too helpful in showing you specifically how to just get Google search results out, which is what we want! It also doesn't tell you that at the time of writing Google haven't yet made a version of their module for Python 3.

Anyway, the background seems to be that years ago Google had a rather clunky XML/SOAP interface for making requests using an old Search API. Thankfully they got rid of it and replaced with a much nicer JSON API. There is a free version of this new one called the CustomSearch API, which limits you to 100 requests per day. (If you want more there is a paid version.) The catch for this is that you are also limited to only ten search results per request. I guess Google unhelpfully assume you will want to paginate search results, with ten results per page? So for example, if you want to get 100 results searching for something, you'll have to call the CustomSearch API ten times (i.e. 10 requests = 10 x 10 search results).

Shut Up & Show Me the Instructions


OK, so anyway it's Google you're dealing with. That means, if you want to use their CustomSearch API, you need a Google account. So if you haven't created a Google account yet, go ahead and create one. Then what you'll need to do is:
(a) create a Project and assign a Google API to it
(b) create a Search Engine with an ID

(a) Create a Project and assign a Google API to it


Go to the Google Developers Console and login:
https://console.developers.google.com

Click the "Create Project" button
-Enter a Project Name, e.g. "testSearch1"
-Enter a Project ID (Google will suggest one for you)

Click the "Enable an API" button
-click on the Custom Search API
Select "Credentials" in the left navigation bar under "APIs & auth"
   
Under Public API access, click on Create new Key
Then click >Server Key >Create (don't bother entering anything in optional IP addresses).
Copy the key code it gives you and save it somewhere safe.

(b) create a Search Engine with an ID


Next, go to the CustomSearch Search Engine management console page. You need to go here, because you need a search engine and its ID to be able to do Google search requests.
https://www.google.com/cse/manage/all

Click on >New search engine
-Enter a Search Engine name, e.g. Google
-Enter a site to search, e.g. www.google.com
-Choose Search the entire web but emphasize included sites
-After this is finished, in the Edit screen for the search engine you've created, click on the Search Engine ID button. Copy this ID code, you'll need it for later.


Check the available Google APIs pages and find the details for the CustomSearch API. You'll notice it has one entity: cse. This is what we're going to focus on.
https://developers.google.com/apis-explorer/#p/
https://developers.google.com/resources/api-libraries/documentation/customsearch/v1/python/latest/customsearch_v1.cse.html

Have a look in there and you will see a large number of parameters we can pass in to the entity when doing a request via the API. The only parameters we really need though are:
q - the search query string
cx - the search engine ID we created
start - the offset from the beginning of the search results.

Let's get it going with Python


OK, our goal is write a quick script in Python to run on the command line. It will make a number of requests using the Google CustomSearch API and send the results to JSON output file. (I'm assuming you're using Python 2.x and have pip installed to download your Python packages.)

Install the Google API client module:
pip install -U google-api-python-client

Edit this program below, inserting your own Project ID and Search Engine ID. I've saved it as "search_google.py", and made a new directory in my current directory named "output" first. This is where the results file will be outputted.

#!/usr/bin/env python

import datetime as dt
import json, sys
from apiclient.discovery import build


if __name__ == '__main__':
    # Create an output file name in the format "srch_res_yyyyMMdd_hhmmss.json"
    now_sfx = dt.datetime.now().strftime('%Y%m%d_%H%M%S')
    output_dir = './output/'
    output_fname = output_dir + 'srch_res_' + now_sfx + '.json'
    search_term = sys.argv[1]
    num_requests = int(sys.argv[2])

    # Key codes we created earlier for the Google CustomSearch API
    search_engine_id = '[My Search Engine ID]'
    api_key = '[My Project API Key]'
   
    # The build function creates a service object. It takes an API name and API
    # version as arguments.
    service = build('customsearch', 'v1', developerKey=api_key)
    # A collection is a set of resources. We know this one is called "cse"
    # because the CustomSearch API page tells us cse "Returns the cse Resource".
    collection = service.cse()

    output_f = open(output_fname, 'ab')

    for i in range(0, num_requests):
        # This is the offset from the beginning to start getting the results from
        start_val = 1 + (i * 10)
        # Make an HTTP request object
        request = collection.list(q=search_term,
            num=10, #this is the maximum & default anyway
            start=start_val,
            cx=search_engine_id
        )
        response = request.execute()
        output = json.dumps(response, sort_keys=True, indent=2)
        output_f.write(output)
        print('Wrote 10 search results...')

    output_f.close()
    print('Output file "{}" written.'.format(output_fname))


Run the program on the command line with the format:
python search_google.py "[my search term]" [number of requests x 10]
e.g.
python search_google.py "vintage tiddlywinks" 3

Your JSON file should be outputted in the output directory you created, containing your search results.